- Introduction to Pneumothorax Detection
- What is a Pneumothorax?
- Why Speed Matters
- Basics of Chest X-Ray Interpretation
- L.I.N.E. Method Overview
- Applying the L.I.N.E. Method
- Tension Pneumothorax Emergency Signs
- Clinical Pearls for Interns
- Case Study: Left-Sided Pneumothorax
- Simple vs Tension Pneumothorax
- Importance of Clinical Context
- Summary: Master the 5-Second Scan
- FAQs
- Further Learning & Tools
Introduction to Pneumothorax Detection GUIDE
Chest X-rays can feel like an unsolvable puzzle for medical interns, especially when trying to identify subtle life-threatening conditions like a pneumothorax. This condition, where air enters the pleural space around the lungs, is not only dangerous but also notoriously missed in its early stages. But what if there was a way to detect it in under 5 seconds?
Welcome to the L.I.N.E. method — a simple, rapid, and logical way to decode X-rays and identify pneumothorax like a pro. Whether you’re an intern, ICU resident, or even a senior clinician brushing up your skills, this guide will transform your confidence in chest film interpretation.
🎓 Ready to take your chest X-ray skills to the next level? Check out our Mastering Chest X-ray Interpretation Course designed for medical professionals!
Watch Full video Here:
What is a Pneumothorax?
A pneumothorax occurs when air escapes from the lung and enters the pleural space — the thin area between the lung and chest wall. Under normal conditions, this space contains no air, just a minimal amount of fluid to reduce friction during breathing.
- Spontaneous: Common in tall, thin individuals without trauma.
- Traumatic: Caused by injury, rib fractures, or stabs.
- Iatrogenic: From medical procedures like central line placement or mechanical ventilation.
Why Speed Matters: Clinical Relevance of Rapid X-ray Interpretation
In high-stakes environments like the ICU or ER, delayed pneumothorax detection can lead to disastrous outcomes — including cardiac arrest from tension physiology. Especially in ventilated patients or those with chest trauma, rapid detection and intervention are critical.
Basics of Chest X-Ray Interpretation
- Air appears black (radiolucent) — it doesn’t absorb X-rays.
- Lungs appear gray — due to soft tissues and vessels within.
L.I.N.E. Method Overview
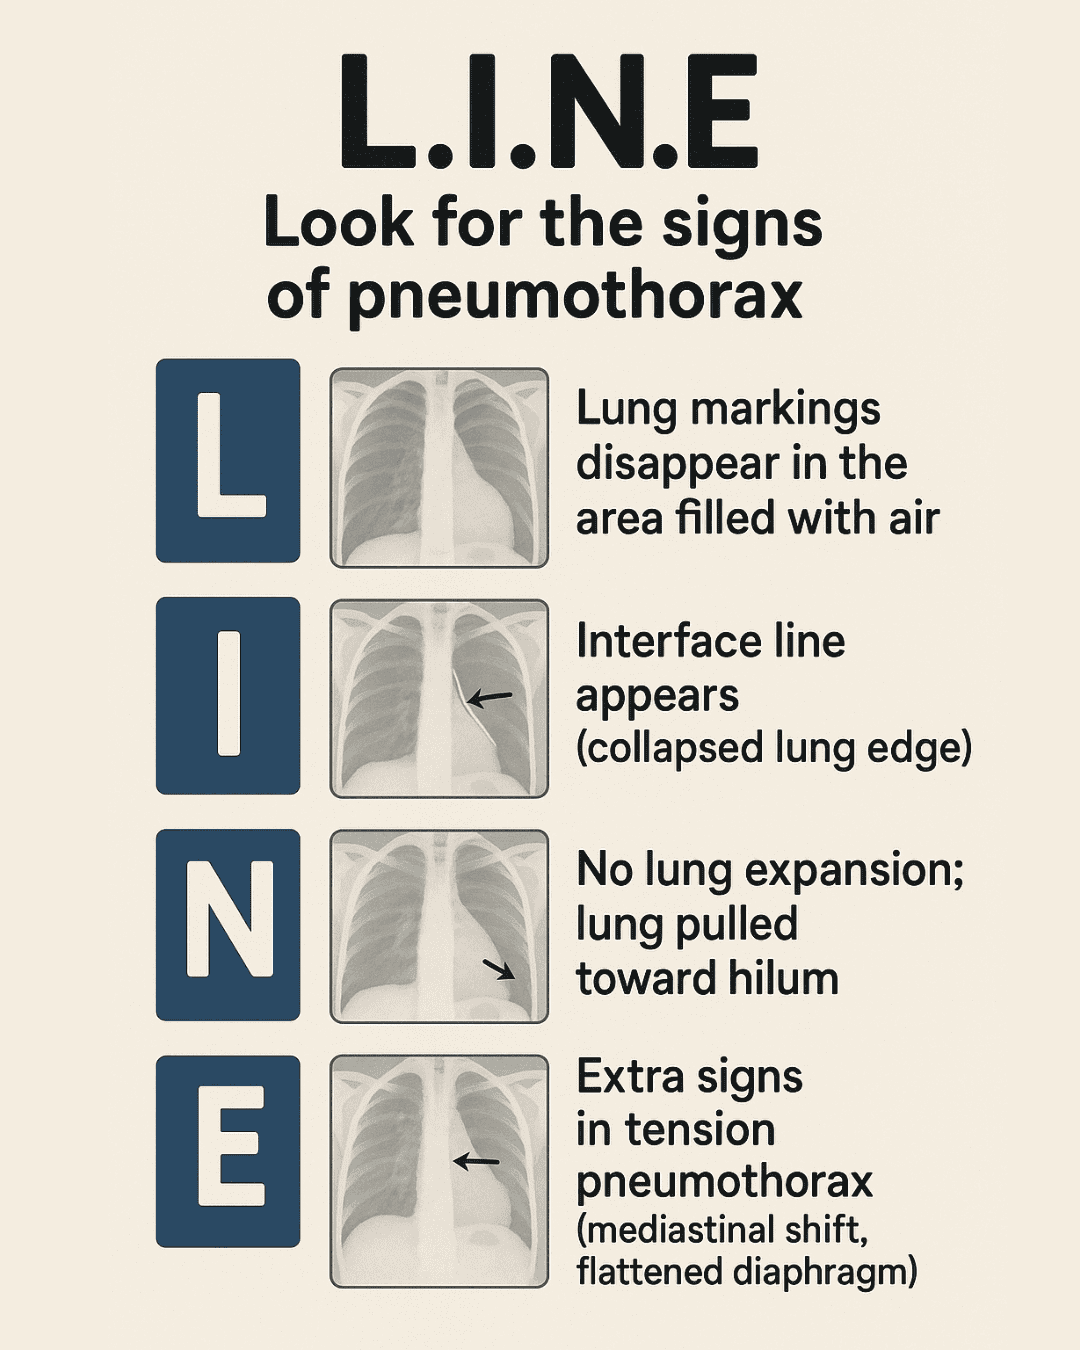
- L — Lung markings disappear
- I — Interface line appears (pleural line)
- N — No lung expansion; lung retracts inward
- E — Extra signs: tension features like mediastinal shift
L — Loss of Lung Markings (Peripheral Lucency)
What to Look For: Absence of vascular markings at the apex or lateral chest.
✅ Clinical Pearl: Always start by checking the apex and lateral margins. Loss of markings here is a red flag.
I — Interface Line (Pleural Line)
What to Look For: A thin, crisp white line (visceral pleura). No vessels or bronchi beyond this line — just air.
✅ Pro Tip: If the white line has black beyond it and doesn’t follow a rib or anatomical structure — it’s pleural air.
N — No Lung Expansion
What to Look For: Lung appears smaller, collapsed inward toward the hilum. Dense, shrunken appearance.
E — Extra Signs of Tension Pneumothorax
- Mediastinal shift to the opposite side
- Flattened or inverted diaphragm
- Widened intercostal spaces
- Shock, hypotension, cyanosis
Why It Happens: Trapped air increases intrathoracic pressure, compressing the heart and vessels.
Applying the L.I.N.E. Method to Real X-rays
Case: Right-Sided Pneumothorax
- No lung markings in right apex and lateral zone
- Pleural line visible
- Mediastinal shift leftward
✅ Diagnosis: Right pneumothorax with early tension physiology.
Tension Pneumothorax: Spotting a Medical Emergency
| Feature | Simple | Tension |
|---|---|---|
| Lung Markings | Absent at edges | Absent at edges |
| Pleural Line | Present | Present |
| Mediastinum | Midline | Shifted away |
| Diaphragm | Normal | Depressed |
| Vitals | Stable | Shock, cyanosis |
Clinical Pearls for Interns and ICU Trainees
- Check both apices first — air rises!
- Skin folds and artifacts can mislead — follow anatomy logically.
- Don’t hesitate if clinical signs suggest tension — decompress immediately.
Case Study: Subtle Left-Sided Pneumothorax
- Missing vascular markings at left apex
- Faint pleural line with air beyond
Comparison Table: Simple vs Tension Pneumothorax
Importance of Integrating Clinical Context with Imaging
- Vitals (BP, HR, RR, O2 Sat)
- History (trauma, recent procedures)
- Symptoms (dyspnea, pleuritic chest pain)
Summary: Mastering Pneumothorax Detection in 5 Seconds
- L — Look for missing lung markings.
- I — Identify the pleural interface.
- N — Note if the lung has collapsed.
- E — Examine for signs of tension.
FAQs on Pneumothorax Detection using the LINE Method
Q1: Can the LINE method detect all types of pneumothorax?
A1: Most effectively in upright films. Supine cases require different clues.
Q2: How to differentiate skin folds from pleural lines?
A2: Skin folds don’t end in black zones and follow external contours.
Q3: Should imaging be delayed in suspected tension pneumothorax?
A3: No. Treat first with needle decompression.
Q4: Is ultrasound superior to X-ray?
A4: Yes — especially in supine or trauma patients.
Q5: Do all pneumothoraces need a chest tube?
A5: Not always. Depends on size, symptoms, and ventilation status.
Q6: What’s the risk after central line insertion?
A6: Pneumothorax is a known complication. Always re-image post-procedure.
📚 Further Learning & Tools
- 📘 Visit our full Chest X-ray Vault
- 📚 Dive into our ECG Library for rhythm mastery
- 🛠️ Use our handy Clinical Tools and calculators
- ▶️ Watch clinical videos on our YouTube channel @ECGKID
💡 Become the go-to clinician in emergencies. Confidence comes from preparation — and repetition.